MTM2.com

A forum for mtm2 discussion
FAQ :: Search :: Members :: Groups :: Register
Login
It is currently Mon Mar 18, 2024 9:24 pm


Post new topic Reply to topic  [ 8 posts ] 
Author Message
 Post subject: Reflections on Reflections
PostPosted: Sat May 17, 2008 8:02 pm 
Member
User avatar

Joined: Mon Oct 27, 2003 7:28 pm
Posts: 603
Many moons ago, I had just gotten back into MTM2 editing and was busily working away at trucks. As I started picking it back up, I noticed that my trucks looked rather slabsided.

<center><img src="http://mtm2.com/~trucks/P2004/mayhemmakerbycale.jpg"></center>

Meanwhile, I noticed that Slick's trucks looked 3-dimensional, with shading and proper body lines.

<center><img src="http://mtm2.com/~trucks/P2004/rollingthunderbyslickster.jpg"></center>

So I decided that the best decision was to ask him how he did it. The solution was the "shading" method described in 
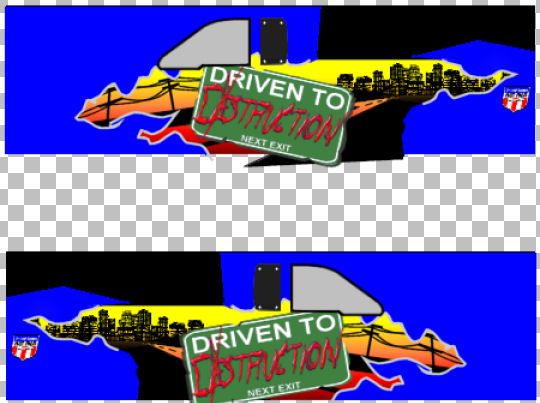
my tutorial. It took a lot of trial-and-error, but I finally got the effect I wanted. So instead of truck textures looking rather flat...

<center><img src="http://cale.mtm2.com/tutorials/reflections/tr-dtd-1.jpg">
http://lh3.ggpht.com/caleputnam/SC9YxCc ... -dtd-1.jpg
</center>

...I was able to make them "pop", and look more 3-dimensional.

<center><img src="http://cale.mtm2.com/tutorials/reflections/tr-dtd-2.jpg">
http://lh5.ggpht.com/caleputnam/SC9Ywic ... -dtd-2.jpg
</center>

That's well and good, and 
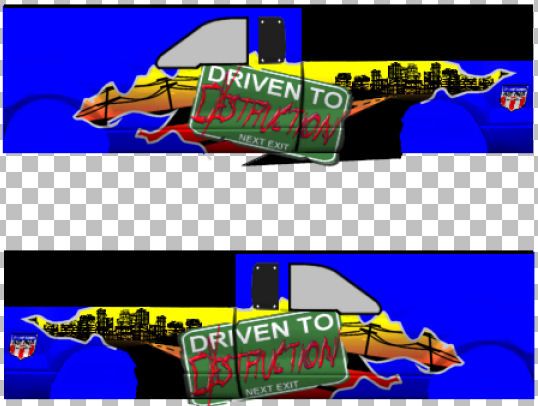
the results are impressive in-game, but there are issues. Namely, with black trucks. If there is a significant amount of black in the paintjob, the shading technique, which works by darkening specific areas of the texture, just flat doesn't work (Cannot get any more black than that...). An early solution was to use less-than-black paint, but that just made trucks look grey, and worse, occassionally brown.

<center><img src="http://mtm2.com/~trucks/P2006/expectnomercy2006bycale.jpg"></center>

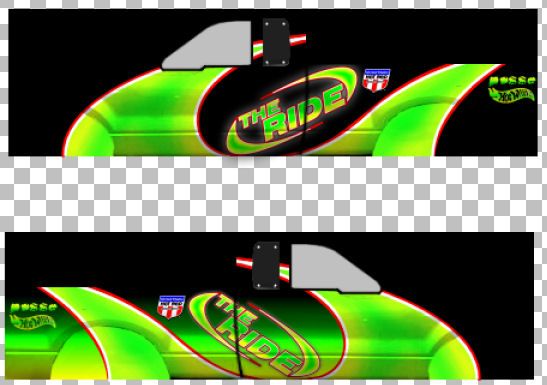
Another early solution was to add color where I had intended initially to be none. Take The Ride 2006. Here, the top texture is what I wanted it to be and the bottom texture is what it ended up as. Notice how the shading works better with the green fade than the flat black, giving the side more detail and dimension:

<center><img src="http://cale.mtm2.com/tutorials/reflections/tr-tr-1.jpg">
http://lh4.ggpht.com/caleputnam/SC9YySc ... r-tr-1.jpg
</center>

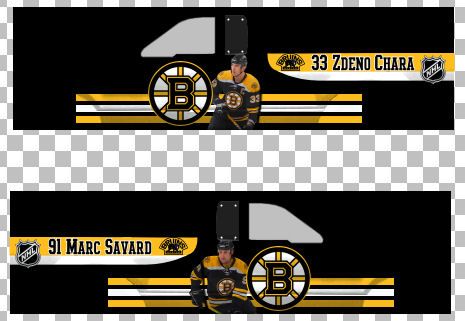
However, this doesn't work for all trucks. My Boston Bruins truck just had too much black for that, and other than what's visible on account of the stripes at the bottom, it just looks flat.

<center><img src="http://cale.mtm2.com/tutorials/reflections/tr-bb-1.jpg">
http://lh5.ggpht.com/caleputnam/SC9Yxic ... r-bb-1.jpg
</center>

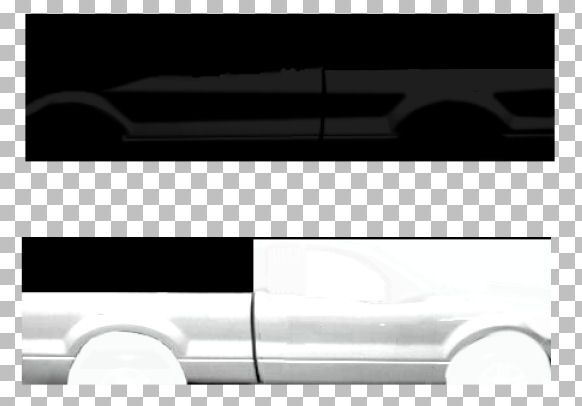
The ultimate solution I have found to be adding reflections in the paint. Yes, MTM2 has it's own reflections, but with the low-poly count bodies, it just doesn't give enough definition on the trucks. But adding them into the texture, much like the shading, gives the truck more definition. It took some trial and error, but editing the shading texture (on the bottom of this pic) gave me the reflection map at the top of the pic. This pic of the map is at the same settings as it is on the trucks - layer is Hard Light type, transparency set to 12.

<center><img src="http://cale.mtm2.com/tutorials/reflections/tr-refl-1.jpg">
http://lh6.ggpht.com/caleputnam/SC9Yyyc ... refl-1.jpg
</center>

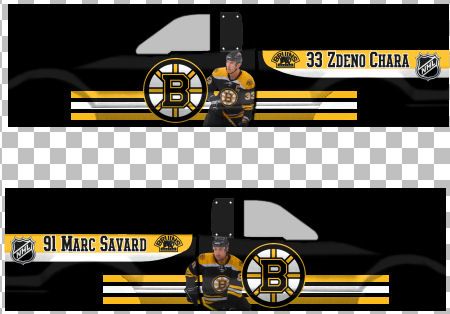
You can see that even on the flat black, it's recognizable as an F-150, and it sure pops out of the screen. What does this do for the trucks? Well, check the Bruins rig...

<center><img src="http://cale.mtm2.com/tutorials/reflections/tr-bb-2.jpg">
http://lh6.ggpht.com/caleputnam/SC9Yxyc ... r-bb-2.jpg
</center>

The Ride suddenly doesn't need its green fade anymore, either. However, the green fade doesn't look bad either, in fact, it too looks shinier and more realistic.

<center><img src="http://cale.mtm2.com/tutorials/reflections/tr-tr-2.jpg">
http://lh5.ggpht.com/caleputnam/SC9Yyic ... r-tr-2.jpg
</center>

So far I am still in the process of perfecting the art. I am far from satisfied with the how the hood comes out, since I am having trouble finding good top-down photos to get the lighting right. But, this is something that I think other truck makers can look into to improve the looks of their trucks. I'll be doing it for my Dodges and Chevies in the future, too.

Hopefully, this is a glimpse into my philosophies on truck making and a help to other truck makers.


Top
 Profile  
 
 Post subject:
PostPosted: Sat May 17, 2008 8:39 pm 
Glow Ball
User avatar

Joined: Tue Feb 02, 1999 7:00 pm
Posts: 19
Nice work, Cale [tu]


Top
 Profile  
 
 Post subject:
PostPosted: Sat May 17, 2008 11:35 pm 
easy company
User avatar

Joined: Tue Feb 29, 2000 2:01 pm
Posts: 2036
oh my! :eek:


Top
 Profile  
 
 Post subject:
PostPosted: Tue May 20, 2008 12:07 am 
Member
User avatar

Joined: Fri May 04, 2001 2:01 pm
Posts: 495
Location: Bathurst, NSW, Australia
Nice post Cale. I too came up against the problem of putting definition into a black-painted truck when I was building my Devil's Dodge replica (so many years ago now). At that time I looked closely at how the stock Rampage was painted and found it had the upper surfaces and edges of the body done in lighter shades of a bluish/purple tint. I copied the colour pallette and tried to duplicate that as best I could (which involved a lot of squinting as the colours were sometimes hard to distinguish ;)).

<center>Image</center>


On the topic of light, here's something else I discovered that may be of interest:

A few years later when building my last major truck project, my Falcon ute, I painted light and dark shades in the textures to reinforce the contours like you've done, along with quite sharp highlights to make the edges and creases of the body stand out, although it was all hand-drawn. I paint wargaming miniatures, and the philosophy with them is to paint shade and highlight colours to emphasise the details of the model and make it "pop" as you say, and this was my early attempt at bringing those techniques across.

<center>Image Image

Image</center>

It looked pretty good to me when viewed in BE, but when I put the truck in the game the effect of the in-game lighting was a little underwhelming. I had structured my truck to share as many vertices as I could and dutifully merged them all, however the result of this was the lighting appeared rather homogeneous and didn't play up the detail. By merging vertices, the normal of every vertex was calculated as the averge angle of all the surrounding faces, so the light and shadow would tend to 'spill' around the sharp edges such as the headlight recesses and bumper assembly, and the creases and ridges I had modelled on it only showed up because of the painted highlight.

<center>Image</center>

Later I would re-use my model in a DirectX programming project in which I exported the bin model to a different format. The export process caused some shared vertices to be 'split' where adjacent faces were mapped to different positions of the texture (DirectX defines texture coordinates as part of the vertex data and each vertex can only have one set of texcoords, so a vertex cannot be shared between two faces that are mapped to different locations of a texture - separate vertices are required. I'm not clear on how the MTM2 engine works in this regard. I know bin models define texcoords as part of the index list for the face, so the method must have been different for DirectX 6.)

The result of this was that some parts of my model became 'unjoined'. As it happened, I had laid out my textures according to the panels of the car, and the hard-to-get-at surfaces were separate as well, so the parts of the model that became unjoined reflected the major panel lines of the car. When the normals were regenerated by the exporting programs, the vertices along the join lines received distinct angles from one another, so those parts of the model show up as a very real edge:

<center>Image

Image</center>

Notice how the specular highlight is cut-off by the edges of the bonnet and bumper as if those were separate panels, and the edges of the recessed headlights and openings stand out. I had been told once by a games maker that a modeller will often use duplicate vertices in this fashion to create hard edges on a model, but at the time I discarded it because I thought merging was what you were meant to do. Having come across this comparison by accident I understand now how it can be put to use. The stock trucks, I have since noticed, have the bed cover unjoined with the back window of the cab for good reason - because if you join the vertical back window with the horizontal cover, the vertices in between will have their normals sticking at an angle, which creates weird effects when the light plays on it. Likewise if I was to do this model again, I would do more of this vertex duplication along the creases on the side of the body and the hood, which I modelled on but currently are lost due to the averaging of normals. While it's true we have relatively low ceilings on how many vertices and polygons we can use in MTM2 models, a little at the right spots can make a bold effect.

_________________
10 years of MTM2 ~ 1998-2008
"Thanks for the MTMories"


Top
 Profile  
 
 Post subject:
PostPosted: Tue May 20, 2008 8:30 am 
Gone Walkabout
User avatar

Joined: Tue Jan 25, 2005 10:35 am
Posts: 665
Amazing and interesting stuff.

_________________
Tournament Host:
MTM2
http://www.mtm2tournaments.com
http://www.mtm2online.com
Evo1
http://www.evo1online.com


Top
 Profile  
 
 Post subject:
PostPosted: Tue May 20, 2008 5:41 pm 
Member
User avatar

Joined: Mon Oct 27, 2003 7:28 pm
Posts: 603
I remember that Devil's Dodge project. I always had an issue with how purple Rampage's highlights look. It's also difficult to approximate those things by hand for different makes of truck. You did a great job with that, considering.

I'll have to play around with that light thing. The issue does indeed come up to vertex counts. The "regular" Bruins truck is over 2000 verts, and the "low vert" is 1400. It's tough to spare any extra verts in these cases when everything else (frame, shocks, etc.) has so much detail, and you can fake the lighting with paint. But, it may still work in some cases.

That being said...

I don't quite know how I'd go about it, but I have some ideas for MTM2 trucks that would look detailed but have fewer verts than we use now. Basically, not fiberglassing the whole thing and reducing frame detail, using textures to do the rest, while still having a 3d cockpit with the window glass. I have in my mind the "proposed MTM3" screenshot Phin posted for an April Fools Day joke years back, with the cool-looking Bigfoot. If the verts could come down, this kind of stuff (the hood lighting and all that) might work. It's probably for another thread, though. (Phin, if you could find that pic... [;)] )


Top
 Profile  
 
 Post subject:
PostPosted: Thu May 22, 2008 12:14 am 
Member
User avatar

Joined: Fri May 04, 2001 2:01 pm
Posts: 495
Location: Bathurst, NSW, Australia
Are you thinking to use transparent textures for the frame (so instead of modelling all the tubes, just use a flat surface with the frame drawn-on)?

_________________
10 years of MTM2 ~ 1998-2008
"Thanks for the MTMories"


Top
 Profile  
 
 Post subject:
PostPosted: Thu May 22, 2008 4:15 pm 
Member
User avatar

Joined: Mon Oct 27, 2003 7:28 pm
Posts: 603
No, although that might work lol.

I was thinking about not fiberglassing the trucks, and simplifying frame layout to be kinda a stock truck with 3d shocks and certain other appendages. Like I said, I'm still getting it straight in my mind.


Top
 Profile  
 
Display posts from previous:  Sort by  
Post new topic Reply to topic  [ 8 posts ] 


Who is online

Users browsing this forum: No registered users and 2 guests


You cannot post new topics in this forum
You cannot reply to topics in this forum
You cannot edit your posts in this forum
You cannot delete your posts in this forum
You cannot post attachments in this forum

Search for:
Jump to:  
Powered by phpBB © 2000, 2002, 2005, 2007 phpBB Group